Is your WordPress site starting to feel messy? When your content isn’t organized well, it can be challenging for visitors to find what they’re looking for, which can make your site less effective.
This lack of organization can quickly frustrate your visitors, leading them to leave your site without finding what they’re searching for—and they might never return. This means you could be losing out on potential customers or readers.
But there’s an easy fix: adding subpages to your WordPress site. In this article we will guide you through, how to Add Subpage in WordPress with 6 easy steps, including screenshots. By following these steps, you’ll make your website more user-friendly and provide a much better experience for your visitors.
Around 478 million websites run on WordPress, which has a 62.7% share of the CMS market
Add Subpage in WordPress: Step-by-Step Guide with Screenshots
Contents
Want to improve your website’s organization and increase traffic? Create subpages in your WordPress site! By grouping related content under main pages, you’ll make it easier for visitors to find what they’re looking for.
Step 1: Log in to the WordPress Dashboard

To begin, log in to your WordPress admin panel (https://www.yourdomain.com/wp-login). Enter your ‘Username’ and ‘Password,’ then click ‘Login’ to access the Dashboard.

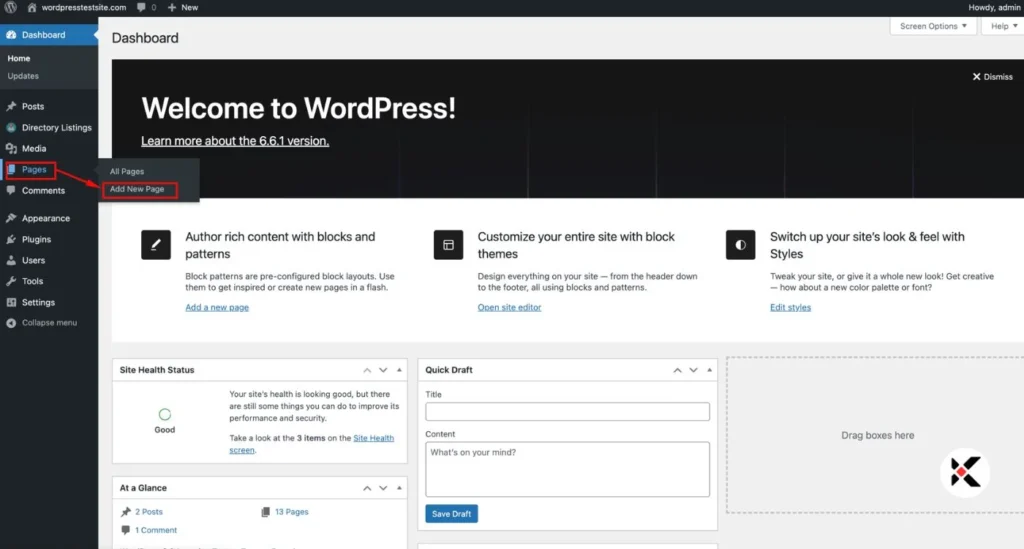
After logging into the ‘WordPress Dashboard’, locate the ‘Pages‘ menu item on the left-hand side of the main menu. Click on ‘Pages’ or select ‘Add New’ directly from the submenu.
Step 3: Create a New Page

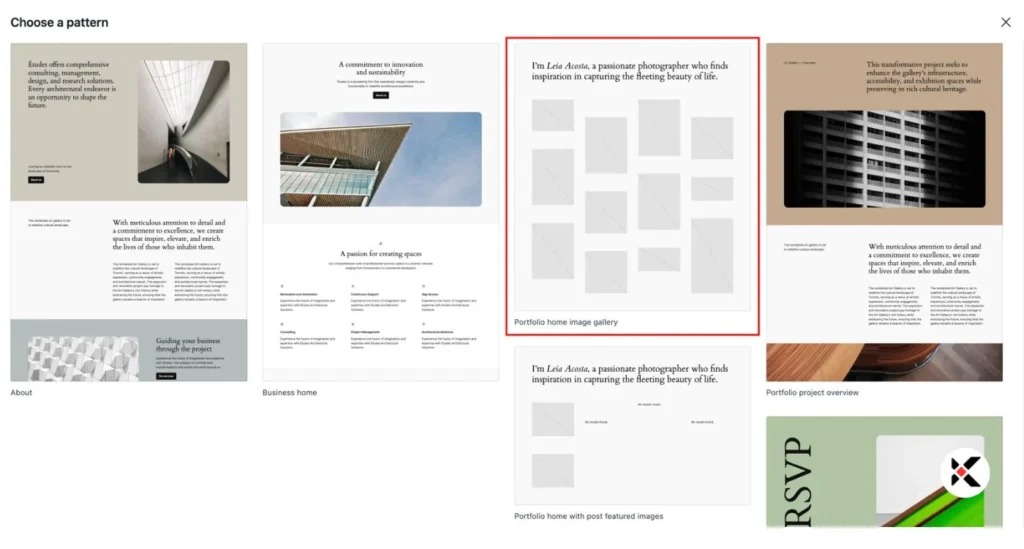
At this point, you can create your new page, which will later be set as a subpage. You can choose a design pattern from selected templates or start from scratch. However, selecting a pattern isn’t mandatory at this stage—you can always do it later after the page is created.
Step 4: Set a Custom URL for the Subpage

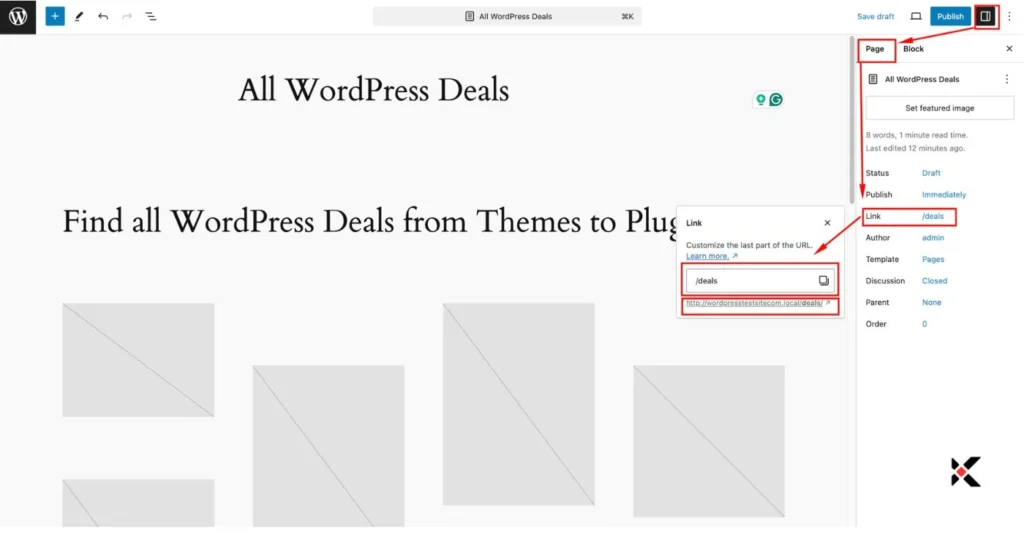
After finishing the content for your new subpage, navigate to the right-side menu. Go to Settings > Pages > Link. In the link section, you can create a custom URL for your subpage, such as (https://www.yourdomain.com/deals/).
Step 5: Select the Parent Page

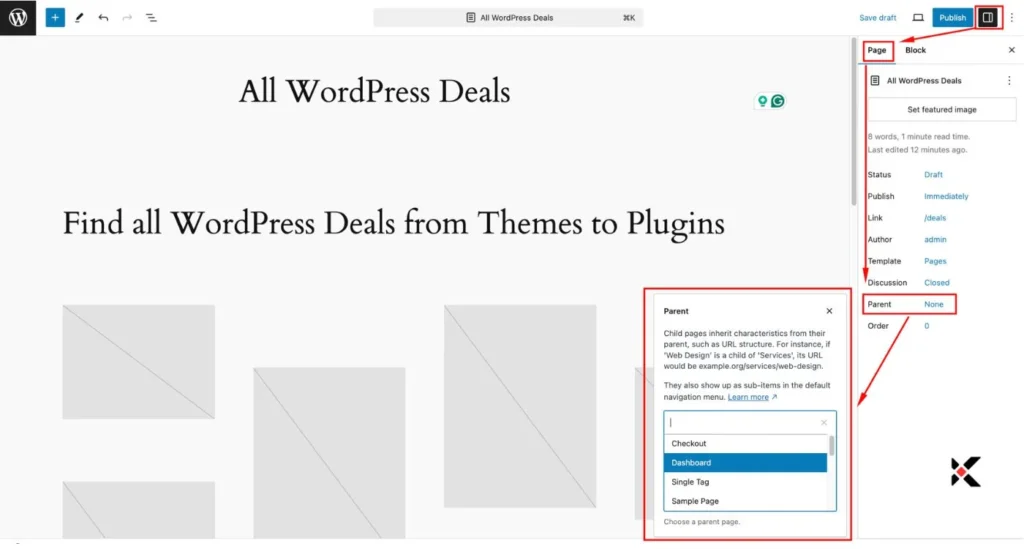
At this stage, you’ll need to connect your subpage to a parent page on your WordPress site. To do this, follow these steps: go to Settings > Pages > Parent. Clicking on ‘Parent’ will display a list of all the pages on your website. Choose the page you want to set as the parent for your new subpage. WordPress may also suggest relevant pages as you type, making it easier to find the right one.
Step 6: Publish Your Subpage

Before publishing, you can customize the page by scheduling its publish time and adjusting its visibility if needed. Once you’ve finalized the page and adjusted all settings, click ‘Publish.’ Your subpage will now be officially recognized by WordPress as a subpage of the selected parent page.
Conclusion
That’s it! You have now learned the essentials of how to add subpage in WordPress. Feel free to give it a try and create your custom subpage.
If you encounter any issues or have questions, please comment below.
If you enjoyed this guide, subscribe to our blog to stay updated with our latest posts. Also, follow us on LinkedIn, X, and Medium for exciting news, offers, and updates.

FAQs: Frequently Asked Questions
Q.1. Do I need a plugin to add subpages in WordPress?
No, adding subpages is a built-in feature of WordPress. You don’t need any additional plugins.
Q.2. Can I change the parent page of a subpage later?
Absolutely! You can edit any existing subpage and choose a different parent page from the “Parent” dropdown menu.
Q.3. What happens if I don’t select a parent page?
If you do not select a parent page, your new page will be separate. You must use its URL separately, as it will not be linked to any parent page.
Q.4. Can I have multiple subpages under one parent page?
Yes, you can create as many subpages as you need under a single parent page. This helps organize complex content structures.
Q.5. How do I change the order of subpages?
To change the order of your subpages, go to the “Pages” section of your WordPress dashboard. Drag and drop the pages to rearrange them as desired.


Leave a Comment